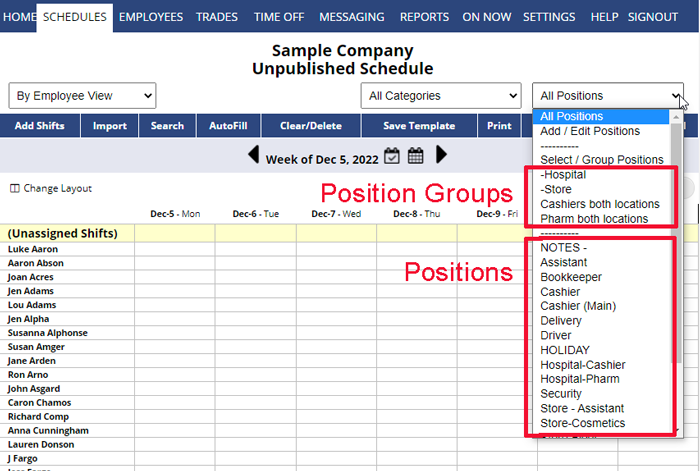
Locations or departments can be added to an account by making “Location-specific Positions” and then creating a “Position Group” that includes those Positions. The location is then quickly viewable by choosing that group in the Positions dropdown menu. (See Multiple locations or departments to determine if you should use separate WhenToWork accounts for your multiple locations or use the “Contact” link at the bottom of your account pages if you need help deciding how to structure your account(s).
Ex. Create Positions such as:
Cashier – Dept 1
Cashier – Dept 2
Sales – Dept 1
Sales – Dept 2
(You can use any names you prefer and each location can have as many different Positions as you like)
You then have the flexibility of viewing any combination of these Positions (one location, or all Cashiers across all locations, etc.) Each employee’s “Position Preferences” can also be set by you (or by the employee if you allow them), to indicate which locations you prefer that they work.
To create “Location-Specific” Positions in one Account:
From any Schedule View:
- In the Positions dropdown, choose Add Positions to open the Add Positions window
- Enter the Position name followed by the Location abbreviation or department Ex. Store 1 – “Cashier” or “Cashier – Store 1” (It is helpful to keep in mind that some schedule views allow you to sort a list of shifts by Position name so whether you choose to put the location name or abbreviation before or after the Position name, just depends on how you want your Position names to sort on the schedules and whether you will be sorting by Positions on the schedule views). Positions can be edited later.
- Click Add Now
- The Position will be added and appear in the list on the right
- To add another location-specific Position – repeat process
To create a Position Group to filter views to show only one location
From any Schedule View:
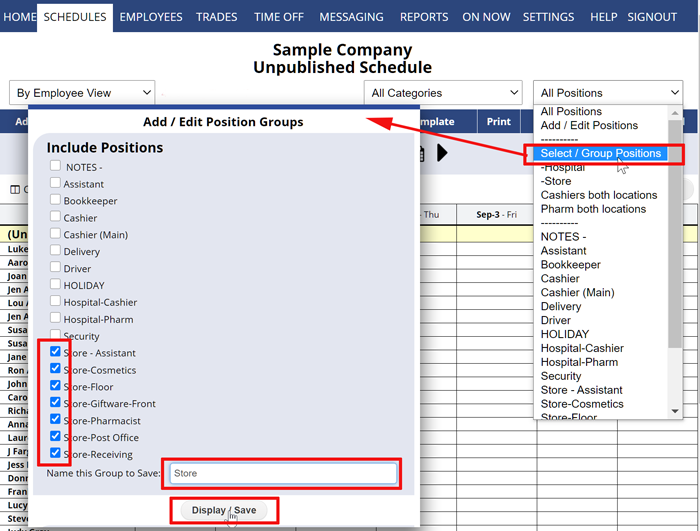
- In the Positions dropdown, choose Select/Group Positions to open the Select/Group Positions window
- Put a check next to the Positions that you want to be included in this group (Ex. all Dept 1 Positions)
- Type the location name (Ex: Dept 1) for the group
- Click the Display/Save button
- The window will close and the schedule will only show the shifts in that Position Group
- The Positions dropdown menu will now also list your location’s Position Group above the regular Positions
departments position( position(

