Rules & tips for uploading a file of shifts
You can upload shifts to unpublished weeks from a csv file. You can save a spreadsheet as a csv file in most programs like Excel or Google sheets.
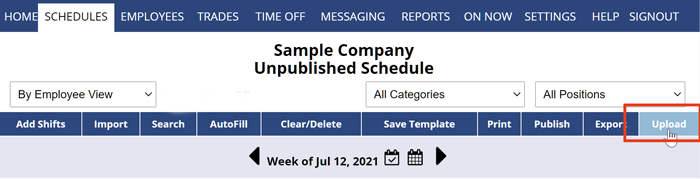
Sample Shift Upload FileYou can download a sample Upload file of shifts by going to the Schedule Grid view in your account and clicking Export and choosing the fields you want to include and then save that to your computer. |
Upload file must be csv format – from Excel you can export your file in csv format, and while not required, we recommend that it have a header row to more easily match fields. See bottom of this page for specific fields and formats allowed.
Unlike Importing, if you open the “Upload Shifts” page while filtered on a Position or Category in the Schedule, this will be ignored when you upload, and all shifts in the file for all Positions & Categories will be attempted to be uploaded from the file.
Uploading is done one week at a time. If you need same schedule each week you can upload from file once, then use our ‘Import’ feature to copy the schedule into future weeks as needed.
Shifts in the file with dates outside that week will be skipped. If your file contains data from multiple weeks and includes dates, just use the ‘Upload’ feature on each week separately using the same file each time because the process will only pull the shifts from the file for the week on which you are currently navigated. You can also edit your file to change your Date field to be instead Day of Week.
While not required, double quotes around text entries can be used. This is recommended if the field may ever have commas or special characters (like in shift description or position fields).
Special Cases
If an assigned shift in the upload file overlaps an already existing shift in the schedule week for that same employee, or overlaps their already approved Time Off, then the uploaded shift will be created as unassigned.
When an assigned shift is uploaded from a file, there is no consideration given for if the assigned shift overlaps preferences like ‘cannot work’ or if employee not currently set to work assigned position. So we recommend always using ‘Analyze Shifts’ after upload to check for such possible conflicts.
Required fields
Must include “position name” and must match exactly the Position name in your account. The only exception to this is if you know the “position ID” number from within your account and prefer to upload using this position field instead (note “position ID” is a number generated by WhenToWork for the different Positions you added in account). If both fields are populated, only the “position ID” field will be used.
Either “date” or “day of week” must be provided, and if both provided only the “date” field will be used. The “date” field must be in mm/dd/yyyy format. The “day of week” can be day names or abbreviations (Monday, Mon, M, etc ) or can be numerical from 0-6 with 0 being the first day of your schedule week. (i.e, if START DAY is Wednesday, then use numeric 0 to add shift on Wednesday, 1 for Thursday, etc.)
Both “start time” and “end time” fields are required and can be entered in a variety of time formats (2:30p, 2:30 PM, 1430, 14:30)
Optional fields
If no “employee name” or “employee ID” given, the shift will be created as an Unassigned shift.
If provided, “employee name” or “employee ID” must match exactly as listed in the account. If both fields are provided, only “employee ID” field will be used. If employee referenced is deleted employee or not listed in account, shift will be created as an Unassigned shift.
The numerical “duration” field is optional, and if provided will be the ‘paid work hours’ for the shift created. If no “duration” field is included, the duration of shift will be auto-calculated as the difference between the start & end time.
The “category” field is optional, but if provided must match an existing Category name or Category abbreviation exactly, otherwise shift will not be uploaded.
The “color” field is optional and is a numerical value 0-16 representing the following codes: 0=black, 1=brown, 2=blue, 3=fuchsia, 4=gray, 5=green, 6=navy, 7=orange, 8=purple, 9=red, 10=turquoise, 11=lavender, 12=lime, 13=salmon, 14=gold, 15=aqua, 16=maroon
The “shift description” is optional and may contain up to 1500 characters of plain text, recommended to enclose in double quotes to avoid issues with comma or other special characters being read correctly on upload.
import a schedule by excel spreadsheet in When To Work – rather than by a template of a schedule already entered in W2W import shifts file spread sheet how to upload a schedule import from spreadsheet import from kronos
import shifts importing shifts add file of shifts multiple shifts