Manager-entered Time Off can immediately unassign the employee from any overlapping shifts and will set those shifts to be unassigned (and notices can immediately go out to those who are able to work that shift if you like).
When an employee requests a Time Off and the manager approves it, the employee also can be unassigned from any overlapping shifts. Time Off can be added to unpublished or published weeks as far into the future as you like.
Time Off can be created in two ways:
- Employee can sign in and enter a Time Off request which is then sent to the manager to approve or deny. (If your SETTINGS>Global Employee Permissions require manager approval of time off.) Employees can only request future dates that are not blocked.
- Managers with permission can also enter Time Off for the employee using the Time Off section or, more quickly, by clicking the corresponding cell for the employee and day on the By Employee Schedule View.
Managers can add a time off in two ways:
- To enter Time Off for an employee using the BY EMPLOYEE schedule view:
From the By Employee Schedule View:- Navigate to the correct week
- Click the cell that corresponds to the day and employee to open the Quick Shift ADD window
- In the upper right, click the “Add Time Off” link
- On the calendar, click the day to start the time off and then enter the number of days off in a row (or choose a partial day off and enter the times and weeks to repeat) and click the Add New Time Off button
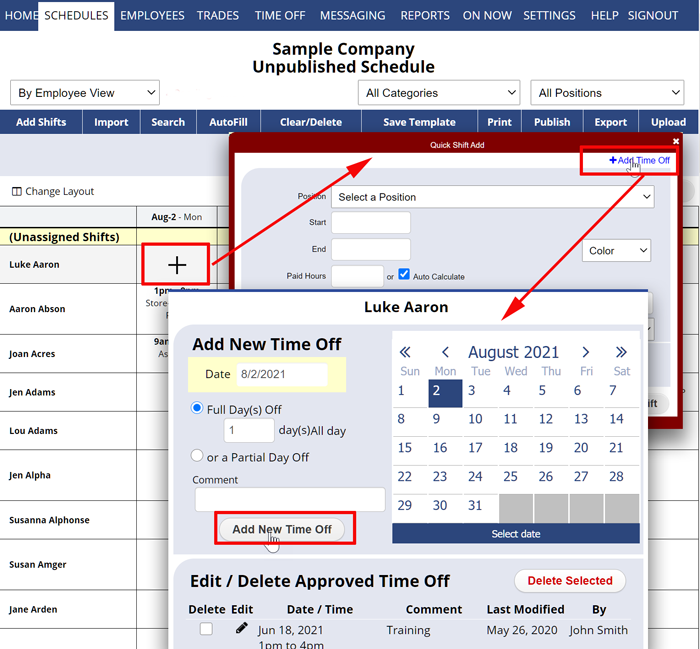
In the Time Off calendar, you may see some dates highlighted as blocked for employees to request time off. Pink highlight means some Positions are blocked, red highlight means all Positions are blocked. As a manager you can add a time off even for a blocked date by clicking “Yes” to continue when warned.
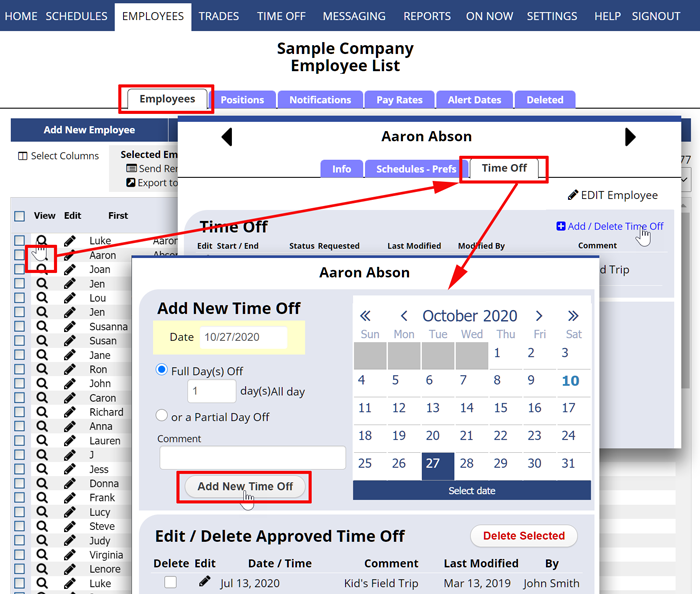
- OR To access the Time Off window from an employee’s details section:
From any page:- Click on the Employee name from the Employee List page or most pages to open the Employee Details window
- Click the TIME OFF tab
- Click the “ADD/Delete Time Off” link
- Click the date on the calendar for the date you want (if you have problems viewing the calendar, you can enter a date manually using the following format: mm/dd/yyyy).
- Choose whether the time off is for a full day or a partial day
- Enter details as to how many days you are granting off (or for a partial day – what the begin and end times and how many weeks to repeat)
- Type any comment regarding the time off that will be included when the employee is notified
- Click the Add New Time Off button
- The Time Off is added and if the employee has set their notifications to notify them when a time off is added or approved, they will be notified by email, text or push notification.
holiday input off adding holidays add time off request add time off request ask for time off request time off vacation leave absence ENTER SICK Put in time off request add day off